
学习整理:arm-trusted-firmware
本文以AArch64为准,内容以翻译原文为主。
资源说明
- 源码地址:arm-trusted-firmware
- 使用说明:user-guide
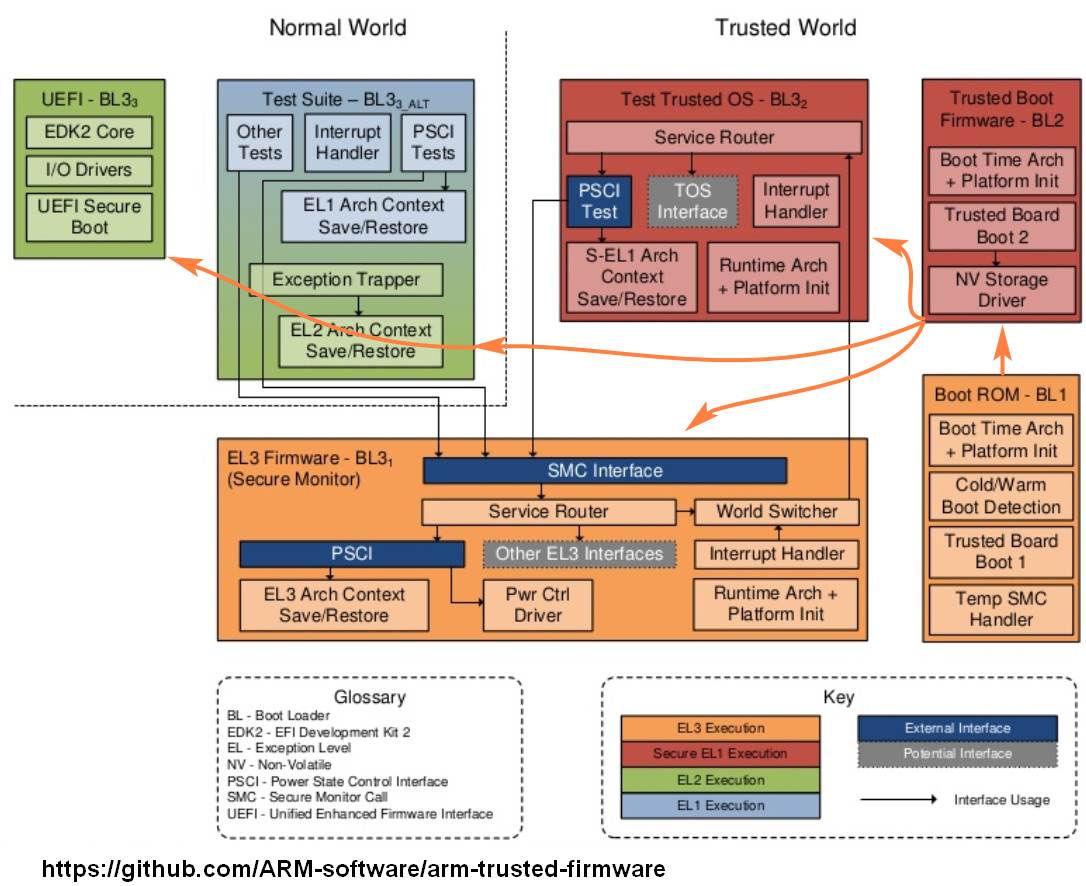
- 框架流程:firmware-design
基本介绍
权限模型 (Exception Levels)

基本分为EL3-EL0,从高level转低level通过ERET指令,从低level转高level通过exception方式。
各个级别说明:
- Non-secure EL0: Unprivileged applications, such as applications downloaded from an App Store.
- Non-secure EL1: Rich OS kernels from, for example, Linux, Microsoft Windows, iOS.
- Non-secure EL2: Hypervisors, from vendors such as Citrix, VMWare, or OK-Labs.
- Secure EL0: Trusted OS applications.
- Secure EL1: Trusted OS kernels from Trusted OS vendors such as Trustonic.
- Secure EL3: Secure Monitor, executing secure platform firmware provided by Silicon vendors and OEMs ARM Trusted Firmware
启动过程
基本分为BL1->BL2->(BL31/BL32/BL33)这几个阶段,整体框图如下:
BL1
- 系统reset vector后在ROM上开始执行,EL3模式,起始执行地址
BL1_RO_BASE - BL1的数据段被拷贝到trusted SRAM的顶端,起始地址
BL1_RW_BASE - 地址定义参见
platform_def.h - BL1阶段参考函数
bl1_main
架构初始化
-
判断cold reset还是warm reset,参考函数
plat_get_my_entrypoint -
cold reset和warm reset走不同代码分支,但至少完成后续这些初始化
-
建立简单的exception vectors,如下:
0x0 : Synchronous exception from Current EL with SP_EL0
0x1 : IRQ exception from Current EL with SP_EL0
0x2 : FIQ exception from Current EL with SP_EL0
0x3 : System Error exception from Current EL with SP_EL0
0x4 : Synchronous exception from Current EL with SP_ELx
0x5 : IRQ exception from Current EL with SP_ELx
0x6 : FIQ exception from Current EL with SP_ELx
0x7 : System Error exception from Current EL with SP_ELx
0x8 : Synchronous exception from Lower EL using aarch64
0x9 : IRQ exception from Lower EL using aarch64
0xa : FIQ exception from Lower EL using aarch64
0xb : System Error exception from Lower EL using aarch64
0xc : Synchronous exception from Lower EL using aarch32
0xd : IRQ exception from Lower EL using aarch32
0xe : FIQ exception from Lower EL using aarch32
0xf : System Error exception from Lower EL using aarch32
当出现异常时会调用函数
plat_report_exception,通过LED反映异常情况:SYS_LED[0] - Security state (Secure=0/Non-Secure=1) SYS_LED[2:1] - Exception Level (EL3=0x3, EL2=0x2, EL1=0x1, EL0=0x0) SYS_LED[7:3] - Exception Class (Sync/Async & origin). This is the value of the status code -
CPU初始化,参考函数
reset_hardler -
配置控制寄存器,
SCTLR_EL3、SCR_EL3、CPTR_EL3、DAIF、MDCR_EL3等等
平台初始化
- 使能Trusted Watchdog
- 初始化console
- 配置内联,保证硬件一致
- 使能MMU,并映射需要访问的memory
- 配置BL2所在的存储
Firmware升级 (可选)
BL2加载和运行
- 打印”Booting Trusted Firmware”以表明BL1执行成功
- 预判并加载BL2到trusted SRAM,预判参考函数
bl1_plat_handle_pre_image_load,如果失败则打印”Failed to load BL2 firmware.” - 调用函数
bl1_plat_handle_post_image_load,传递BL2参数,如memory layout - 运行BL2
BL2
- 在trusted SRAM上执行,EL1模式,起始地址
BL2_BASE
架构初始化
- 为ATF子目标和通用软件正常运行而初始化
- 清 CPACR.FPEN,使EL1和EL0可以访问Floating Point和Advanced SIMD
平台初始化
- 初始化console
- 配置可以加载下一个BL阶段所使用的存储设备
- 使能MMU,并映射需要访问的memory
- 配置平台安全设置,使能访问控制组件
- 保留部分memory,用于传递数据给下一个BL EL3 Runtime Software
- 定义额外可用的memory,给后面每个BL的加载使用
加载Image
-
load_scp_bl2,(separate System Control Processor) -
load_bl31,EL3 Runtime Software image load,从存储设备加载到trusted SRAM- 通过提升SMC将控制回到BL1,将BL31的入口提供给BL1
- BL1关闭MMU,并通过清除SCTLR_EL3.M/I/C,冲掉data cache
- BL1将控制转给BL31的入口
-
load_bl32(optional), Secure-EL1 Payload image load -
load_bl33, Non-trusted Firmware image load,从存储设备加载到non-secure memory
BL31
- 在trusted SRAM上执行,EL3模式,入口地址
BL31_BASE
架构初始化
与BL1的架构初始化相近,覆盖BL1的初始化
-
初始化每个CPU的数据框架,包括各个CPU的cache
-
替换BL1的exception vector
平台初始化
使normal world software能正常工作
-
初始化console
-
配置内联使其硬件一致
-
使能MMU,并映射需要访问的memory
-
初始化通用中断控制器
-
初始化电源控制器设备
-
检测系统拓扑
Runtime services初始化
EL3 runtime services framework如下:
- Standard service calls,如PSCI(Power State Coordination Interface)
- Secure-EL1 Payload Dispatcher service
- CPU implementation service
BL32 (可选,略过)
BL33
- Non-trusted Firmware image
- EL3 Runtime Software使用BL2提供的entrypoint信息跳转到BL33,EL2模式
地址布局
               DRAM
0xffffffff +----------+
           :          :
           |----------|
           |HW_CONFIG |
0x83000000 |----------|  (non-secure)
           |          |
0x80000000 +----------+

           Trusted SRAM
0x04040000 +----------+  loaded by BL2  +----------------+
           | BL1 (rw) |  <<<<<<<<<<<<<  |                |
           |----------|  <<<<<<<<<<<<<  |  BL31 NOBITS   |
           |   BL2    |  <<<<<<<<<<<<<  |                |
           |----------|  <<<<<<<<<<<<<  |----------------|
           |          |  <<<<<<<<<<<<<  | BL31 PROGBITS  |
           |          |  <<<<<<<<<<<<<  |----------------|
           |          |  <<<<<<<<<<<<<  |     BL32       |
0x04002000 +----------+                 +----------------+
           |fw_configs|
0x04001000 +----------+
           |  Shared  |
0x04000000 +----------+

           Trusted ROM
0x04000000 +----------+
           | BL1 (ro) |
0x00000000 +----------+
关于FIP
- Firmware Image Package
- 通常BL1被烧录在ROM中,BL2/BL31/BL32/BL33/uboot被打包成fip.bin烧录在flash中;启动时通过检索UUID找到fip.bin中的各个image,参考
firmware_image_package.h - 通过函数plat_get_image_source()读取数FIP数据
tools/fiptool/fiptool可以生成和分解fip文件
评论